Pages


Monday, December 31, 2012

Low Light Photography

 
Low Light Photography is photographic tips in minimum of light without flash to get sharp photos. The moments city view, music concert, or party sometimes need to be photographed without flash.

Low Light Photography 1.jpg 
Photo courtesy of Grzegorz


Following are Low Light Photography tips:
1. Tripod, is reliable and helpful accessories.
2. No tripod? Exploit the place surrounding you to keep your photos okay, such as lean-on your body to wall, to podium stairway, or to tree. Keep your camera stable.


Low Light Photography 2.jpg


3. Set aperture as wide as possible of the lens.
4. If above tips have not enough yet, increase your camera ISO to reach shutter speed 1/60 second minimum (new generation cameras still yield low noise photos at ISO setting more than 1000)
5. Activate High ISO Noise Reduction feature of your camera if you apply point 4 above.
6. You can pass point 5, but you can use post production software to reduce the noise. The softwares Noise Ninja, Imagenomic Noiseware, or Nik's Dfine are not so bad to reduce noise. Lightroom 4 has sophisticated noise reduction.
7. Read posting about optimum shutter speed: Xmm focal length has optimum shutter speed over 1/X second. Click here for detail.

Sunday, December 30, 2012

How to Photograph Fireworks

 
How to Photograph Fireworks - Fireworks is one of the events at welcoming the new year party. It commonly done by most of the people around world, but it's good to capture this event, because every year the fireworks form would be different.
Photographing fireworks is not as easy as you might think. But there are tricks to get the picture you expect. Followings are the tricks:

  • Do not guess direction fireworks
The difficulty in photographing fireworks is that we do not know where the fireworks will light up. So just point the lens up roughly where fireworks will light up, and set the zoom lens that can cover large areas (standard or kit zoom lens is ideal for this event), so you can shoot fireworks will light up anywhere. Then edit the results in your computer.
  • Using tripod is a must
It seems this is mandatory, because we will be using slow shutter speed, 1 second or longer. Using a tripod will ensure it does not happen a shake of the camera in order to obtain sharper results. If you have the shutter release (either wired or wireless) take it and use it. With the shutter release, your eyes will be free to oversee the sky so your chances of obtaining a greater right moment.

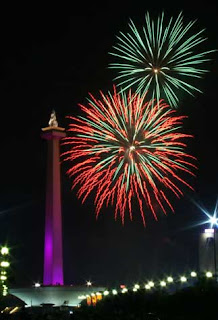
  • Take advantage of the fixed objects in the composition
Firework 1.jpg
It could be a building, monument, or any building that would indicate where the photo was taken. In addition to marking the location, utilization of fixed objects can serve as a frame. See the picture above.

  • Use the largest camera resolution
Use the largest image size that can be produced with your camera. This is to support the goals of the two tips above, so when you crop an image, the image that has been cut is still good enough to print large size. Be ideal if the camera has a RAW feature, apply it!
  • Turn off autofocus
Because of the general condition of dark and lit fireworks just a moment, autofocus camera can become confused and lose the moment because it is not time to get focused. So you should set the focus on the farthest distance (infinity) then turn off the auto focus and switch to manual focusing. One more thing, do not forget when you change the zoom lens, set the new focus.
  • Turn off flash
Usually in the manual setting flash did not turn on. Just to make sure, because in these conditions the flash is useless, the short-range and could even worsen the picture for illuminating unnecessary areas. If using the internal flash, a charging may be a nuisance.
  • Exposure Setting Manually
Firework 2.jpg
Since we do not know 'where exactly' fireworks will explode, to be a fairly sharp picture in all the range we have gained a 'deep' Depth of Field. Exposure settings that I and also  a lot of photographers used to apply are mentioned in the table above.

An asterisk (*) indicates the settings I tried with a DSLR camera with a small resolution. If you have a DSLR camera more than 10 MP resolution may sharper. Because this setting is opposed to the camera program that the program will compensate the aperture with the shutter speed, so it should be done with manual settings.

  • Take photos as much as you can
Do not review too long for their moment will be fast and time is limited, take the picture as much as possible. Moreover, you do not need to buy the celluloid film, do not limit yourself. The more you snap, at least the more good photos to be had. The results can be selected at home.

Happy photographing new year fireworks.

Saturday, December 29, 2012

Tips for Sharp Picture

 
Tips for Sharp Picture - Photography lovers trend to get sharp pictures by applying some photography techniques and adding camera accessories or optimize camera features. Starting from tripod, lens, and may be the camera, up to editor software to get the sharpest pictures.

Sharp Picture.jpg

Photo credit by peasap.


This article is giving some tips to get sharp picture as follow:


  • Holding camera
Holding camera will affect the stability of camera, i.e sharp picture.


Setting the higher shutter speed will make sharper picture. You should remember that if you take picture by hand shutter speed should faster than focal length:
  1. If you use 50mm lens, the shutter speed should be 1/60 second or faster.
  2. If you use 100mm lens, the shutter speed should be 1/125 second or faster.
  3. If you use 200mm lens, the shutter speed should be 1/250 second or faster.


Depth of field (focused area of the picture) depends to the aperture value. Reducing aperture (in this case increase value to f/22 for instance) will increase depth of field. It means the focused area of the picture become wider from the nearest object to the farthermost objects, so that the picture is not sharp anymore.
Thus you should increasing aperture (reducing the value to f/4 or f/2.8) to get sharp picture. If you do this, automatically you will get faster shutter speed.


Increasing ISO will increase shutter speed and you can choose the wider aperture. Indoor photography should increase ISO, but do not do it too much. You can set ISO at 600 or 800 for indoor photography. If you set ISO higher than 800 usually noise (small points) start seen.


  • Focus
You do not always use autofocus feature. When taking face photograph at short distance, you should set focus to the eyes of object. When you take photograph set the focus to the area you want to look sharpest. Autofocus feature can be wrong focusing or out of your area destination.


  • Lens
Try to buy the best lens for your DSLR. Qualified lens will significantly upgrade the sharpness of your photograph. The kit lens usually under quality or at least standard quality. Qualified lenses have wide aperture (f/2.8 or lower) although have long focal. So, try to buy camera and lenses separately.


  • Lens Sweet Spot
Every lens has each sweet spot. Sweet spot is aperture of the lens that can produce the sharpest photograph. Sweet spot usually two stops under maximum lens aperture. Lens f/2.8, for instance, has sweet spot at f/5.6. So, set aperture f/5.6 if you use the f/2.8 lens to get the sharpest photograph.


  • Tripod
If you want to get sharper photographs, use tripod. If you want to take HDR or panoramic photographs using tripod is a must.

Friday, December 28, 2012

8 Panning Photography Tips

 
Panning Photography is picture taking by moving camera unidirectional with direction of object movement that we shoot, so that the object would seem to focusing whereas background and foreground seem blur or out of focus.

Panning Photograph 1.jpg

Panning photograph taken by pocket camera
Credit photo: andrisuprihadi.wordpress.com

Following 8 practical steps panning photography:
 

  • Do not use tripod. Use your hands for native movement of camera.
  • Set camera to Shutter Priority mode (S or Tv).
  • Set shutter speed between 1/30 to 1/8 second.
  • Direct the camera to object (choose colorful background to get amazing blur background before directing your camera).
  • Shoot the camera to the object, press shutter button half way for focusing.
  • Move your hand as smooth as possible parallel to the object movement.
  • If hand movement has the same movement with the object, press release button for exposure.
Panning Photograph 2.jpg

Credit photo: pelauts.com
  • Try.. Try.. And try again to get smoother hand movement.

Aperture and Depth of Field

 
Aperture is defined as the opening shutter lens while taking the picture. It is one of three photographic triangle in the Exposure Concept.

Aperture and Depth of Field 1.jpg

When we press the shutter button, the shutter in-front of camera sensor will open. The aperture setting decides how wide the shutter will opened. The light will enter to the camera sensor much more as the increasing of shutter opening.
 

Aperture or opening is stated in f-stop unit. If we read aperture 5.6, in photography could be stated as f/5.6. The statement is: f-stop become small makes aperture or opening becomes wide, it means more lights contact with camera sensor. See the illustration below:


Aperture and Depth of Field 2.jpg

It means wide opening is given by small number of f-stop or aperture and vice versa.

Depth of Field
 

Depth of Filed – DoF, is the measurement how far the field in focus area of the photograph. Wide Depth of Field (DoF) means the objects near to the camera to the farthermost will be sharp focused in the photograph. Shallow Depth of Field means only definite object will be focused and the rest will be out of focus or blur.

Aperture and Depth of Field 3.jpg

Deep Depth of Field will be got by setting the aperture to the biggest number or the narrowest opening, while Shallow Depth of Field will be got by setting the smallest number of aperture or the widest opening.


The Depth of Field Concept is useful in portrait photography and macro photography, however, all kind of photography will need this concept.

Thursday, December 27, 2012

Shutter Speed Concept

 
Shutter Speed is defined as the moment of opening the camera shutter. This means Shutter Speed is the time of camera sensor contact to the light from the object to be photographed.

Shutter is a part of camera to shut light way to the camera sensor or celluloid film. In camera equipped with viewfinder without live-view, shutter is closed in default position until shutter button is pressed when take photograph. In camera equipped with live-view, shutter default position is opened or just a peeping point opened to let light enter to sensor. The sketch of shutter position in the camera as follow:
 

Shutter Speed Concept 2.jpg

Using the Shutter Speed Concept on the camera applications as one of photographic triangle:
  • Shutter speed setting to 500 is mean the camera sensor contact to the light from the object to be photographed only a five hundredth second (or exposure time 1/500 second). If you set the shutter speed to 30 seconds, it means exposure time of the camera sensor is 30 seconds.
  • Shutter speed setting in the camera usually multiplied by 2, so we usually see the sequence as 1/500, 1/250, 1/125, 1/60, 1/30, and so on. Some cameras have 1/3 stop setting to get shutter speed setting closer. We can see the sequence as 1/500, 1/400, 1/320, 1/250, 1/200, 1/160, etc.
  • We should apply correct shutter speed to get sharp and clear photos. The save shutter speed usually 1/60 or faster. To void blur or out of focus photos sometimes we should use tripod or Image Stabilization feature of the camera.

Shutter Speed Concept.jpg
  
  • Another save shutter speed definition is shutter speed should me more than vocal length. If we use 50mm lens, the shutter speed should be 1/60 second at minimum of setting. If we use 17mm lens, minimum shutter speed is 1/30 second.
  • Shutter speed for freezing movement should use shutter speed as fast as possible. Faster movement needs faster shutter speed to freeze the movement. Shooting the flying bird, for example, uses shutter speed at 1/1000 second and Shutter Priority mode. ISO ideally sets to auto option to get sharp picture. Sport photographers usually use the Shutter Priority (S/Tv) mode.
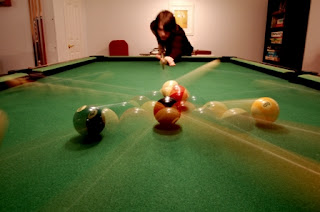
  • Shutter speed to show movement effect. When we take picture of dynamic objects, we can slow shutter speed to show the movement effect. We should anchorage our picture to the static object. See the picture below:
Shutter Speed Concept 1.jpg
Picture source: en.wikipedia.org

Wednesday, December 26, 2012

ISO Concept

 
ISO Concept is analog with ASA setting in celluloid film photography. ISO is defined as the level of sensitivity of camera sensor to the light. ISO Concept is one of three angle photographic triangle. Higher ISO setting makes the sensor more sensitive to the light.

Parable of ISO Concept we can imagine the bees community:

  1. An ISO is a worker bee. ISO 100 setting means we have 100 worker bees. ISO 200 setting means we have 200 worker bees, and so on. 
  2. Each worker bee will get the light entering to the camera to make the image. If you and me use the same camera and we set the aperture to f/3.5. I set the ISO to 200 but you set the ISO to 100. Whose image completely finished faster?
Outline of ISO Concept:

  1. Upgrading ISO setting from 100 to 200 in the same aperture (we can set aperture to f/3.5 or lock the aperture with Aperture Priority Mode – A or Av) will reduce the time to make image to the camera sensor two times faster. The Shutter Speed will change from 1/125 second in ISO 100 to 1/250 second in ISO 200.
  2. If we set ISO to 400, it will make the Shutter Speed become 1/500 second, and so on.
  3. Reducing exposure time into half value is called exposure 1 stop up.
In case of aperture you can set the shutter speed constantly at 1/125 second for instance, by setting the Shutter Priority mode – S or Tv), and try to change the ISO setting from 100, 200, 400, and so on. Look at the aperture of each ISO setting.

Tuesday, December 25, 2012

Exposure Concept

 
Exposure Concept is the basic knowledge of photography. If you want to make creative photographs, you have to know the Exposure Concept for the first step.

We frequently enjoy with auto mode for long time after we bought a camera, even if Digital SLR or point and shoot. This mode give us ease and satisfaction, however, it can't develop our creativity in photography, so we have to leave this mode. The initial step for creativity is understanding the Exposure Concept.

There are three elements to understand the Exposure Concept called Photographic Triangle. Each of element has closed relation to the light, how the light go into the camera and interact with it.


Exposure Concept.jpg

The three elements are:

  1. ISO, the level of sensitivity camera sensor to the light
  2. Aperture, the lens opening while taking photograph
  3. Shutter Speed, the moment of lens opening.
Exposure Concept 2.jpg
Picture source: motoyuk.com

The interaction of the three elements of Triangle of Photography is called Exposure Concept. The change of each element will change the other elements.

I always use parable to understand the Exposure Concept as water tapping:

  1. ISO is how strength of the water flow from the source.
  2. Aperture is how wide we open the tap.
  3. Shutter Speed is how long we open the tap.
This is not the perfect parable, however, I got the basic mind of the Exposure Concept. You can read Understanding Exposure by Bryan Peterson for detail of the Exposure Concept. How do you think about it?